
This document provides guidance to system administrators on using the provided Installshield setup files to undertake network installations suitable to the requirements of their organisation. Three techniques are offered
A standard administrative install, with optional application of transform files and scripting for silent installation to end-users.
A manual installation on a single fileserver with both software and data run to the clients across the network (requires at least version 1.2.4 of the Framework Freeviewer and is only suitable within a Local Area Network)
Installation direct from a CD image located in a shared network folder.
Undertake a Standard Administrative Install
This allows the disk image to be copied to the network. Then anyone with access to the directory can install the setup on their local machine with the privileges of the administrator who carried out the administrative install.
Ignore the Custom Framework Archaeology Installer. Instead use the setup.exe files in the two directories on the CD, Data and Application
From the Run dialog execute each set up with the following switches /V /A for a standard Windows Installer administrative install to a shared network location. Example:
D:\Data\setup.exe /V /A
This will unpack the files to the network and provide access to the Windows Installer packages (.msi).
Individual users can then install as required to their machines by installing the .msi packages for the Framework Freeviewer and the included data. This will install the files locally.
The default location for both the application and the data installations is C:\program files. Organisations that only allow users to operate in the context of the Users group should ensure that they change the default folder to a new folder on the local drive at the installation prompt. Alternatively system administrators can edit the installation packages by providing a .mst file to match the requirements of their organisation’s deployment policies.
Editing the Microsoft Windows Installer installation (.msi) packages
System administrators can tailor the installation by providing a Windows Installer Transform (.mst) file. There are a number of free utilities which can be used for creating and editing Transforms. Of these probably the easiest to use is InstallTailor from Wise Solutions, Inc. which allows a system administrator to walk through the installation and set the preferred default options for his or her organisation. Orca requires more technical knowledge but has the ability to customise every aspect of the install package.
Microsoft Systems Management Server also provides utilities for creating and deploying transform files.
Scripting the install
The Windows Installer engine msiexec can be used to script attended and unattended installs from the command line. A syntax description is available.
Some examples of using msiexec with a transform assuming that the T5 Assessment data package has been installed to a folder in drive Q:
To install silently (/qn or /qn+ to provide a final modal dialog box) with a transform applied use the TRANSFORMS parameter:
msiexec /i “Q:\Test\TestAdminInstallT5Data\Framework Archaeology Terminal Five Excavations at Heathrow Assessment Data.msi”
TRANSFORMS=”Q:\Test\TestAdminInstallT5Data\Framework Archaeology Terminal Five Excavations at Heathrow Assessment Data.Mst” /qn+
To install silently without a Transform:
msiexec /i “Q:\Test\TestAdminInstallT5Data\Framework Archaeology Terminal Five Excavations at Heathrow Assessment Data.msi” /qn
Run software and data across the network
This requires version 1.2.4 or later of the Framework Freeviewer.
The Installshield installation will typically attempt to install both the software (the Framework Freeviewer) and the data to the local machine. This will typically require the installation to be run in the context of a user who is a member of Power Users or Administrators on the local machine.
For organisations that wish to minimise the number of installations that need to be carried out where there are a number of potential users who wish to use the software and/or consult the data, this document describes a method of installing the Framework Freeviewer and associated datasets(s) on a single computer.
This single installation can then be accessed from client workstations using a single short-cut and either a drive-mapping or a UNC path. With this technique no other alterations are required to the client machines simplifying both deployment and removal of the software and data.
Planning the Install
The first step is to plan how the installation will be accessed by the client workstations. This can either be through a drive mapping (for example: K:/Framework Archaeology) or a UNC path (e.g. \\MyMachine\Applications\Framework Archaeology).
Before running the Installshield installations this needs to be set-up on the machine where the software and data will be installed. The example walk-through will use UNC naming. To use a drive mapping ensure that the mapping is created on the installation machine.
Undertaking the Install
The installation must be carried out at the machine where the software and data will be installed. This can done either through physical access to the console or via a remote management tool such as Microsoft Terminal Services. In the examples, the machine where the installation is carried out is called WA165autoworld.
- Create the shared folder where the installation will be placed
Example: C:\FFVNetworkInstall which can be shared and mapped as K:\FFVNetworkInstall
- Run the Framework Freeviewer software installation
- Proceed to the Destination Folder section of the installation wizard

- Select the Change button to change the location of the installation
- Either browse to the mapping or in the Folder Name type the UNC path for the installation location.
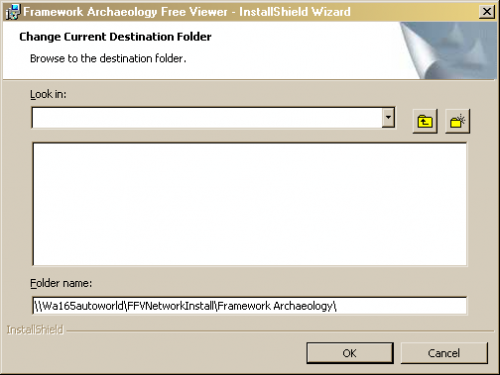
- Continue the installation as normal
- Install the data in the same way by changing the location of the destination folder as described above. The installation can be to the same machine and shared folder or to a different machine and shared folder.
- Finally once both installations are complete copy the file archpublisher.ini from either C:\Windows or C:\WinNT (%Windir%) to the same folder where the file BasicGIS.exe is located. That is \\Wa165autoworld\FFVNetworkInstall\Framework Archaeology in the example above.
It is wise to leave the original in the %Windir% directory since this will be updated by any additional datasets that may be subsequently deployed. In that situation once the new dataset is installed the updated archpublisher.ini can again be copied to the BasicGIS executable’s directory to allow access to the new dataset.
The Client
Two steps are necessary to allow a client workstation to use the software on the installation machine, if the use of drive mappings was preferred. Only one step will be necessary if UNC was chosen
If a drive mapping was planned, then setting up the client is simply a matter of ensuring that the drive mapping used on the installation machine is available. This needs to be identical to that used on the installation machine.
Set up a short cut to the executable BasicGIS.exe for the client.
These tasks can be undertaken manually or scripted if preferred.
Permissions on the installation machine
The data storage used includes Jet (Microsoft Access .mdb) format files. Users therefore require write permissions to the folder AttributeData in order to create the .ldb locking file used by the Jet engine. The .ini file located in the data folder also needs to be written too.
Users therefore require read and write access to the directory and sub-directories storing the data.
Installation from the CD image
The entire contents of the CD can be copied to a shared directory on the network. Users with access to this directory can simply install from the custom Framework Archaeology installer as if they had the CD in their local machine.
This technique will require that users have at least Power User rights to their local machine.